Variant Manager User Manual
For questions about this manual or this project, contact Thomas Seufert at seufet@users.sourceforge.net.
Support Arbitrary Data Capture With Editors
Introduction
Don’t Panic
The Variant Manager is a powerful tool whose complexity may at first seem daunting. However, learning to use it effectively does not take much effort.
Purpose
The Variant Manager was designed to do exactly one thing well: create and manage configuration information for applications, especially Roguelike games. It was intended to serve an audience of sophisticated computer users who are not necessarily but will most likely be programmers. As such, while attempts have been made to polish and foolproof it, things can still go wrong if you try to break it or don’t know what you’re doing. Then again, that’s true of every Microsoft app ever written…
Overview
The Variant Manager creates projects. A project is a directory structure containing XML files specifying:
1. the structure of information to be captured
2. sets of attributes which specify logical groupings of information within that structure
3. a set of editors for capturing different types of information
4. a list of languages to be supported
5. high-level information about the project, such as name and version
6. the information itself, corresponding to items 1-4
Items 1-3 comprise a project’s Schema and are stored in schema.xml. Items 4-5 make up a project’s “variant” information, and are stored in variant.xml. Finally, Item 6 is the Data itself, stored in data.xml.
Viewing and Editing Data
Groups and Instances
The Data for a Variant consists of a tree of “Groups” and the “Instances” contained in each group. Groups can contain other groups, and Instances can also contain Groups, but Instances cannot contain other Instances.
Although the User Interface looks a bit like managing folders and files in Windows Explorer, there is one important difference: When you create a Group, you are really defining a type, which will affect how the Instances in that Group are configured. A type is defined as the path from a Node to the Root, ignoring any Instance nodes along the way.
Suppose you have a group “Monsters” and each Monster can
have some “Items”. In the Variant
Manager, you would create the group “Monsters” under the root node and create
some Instances using ![]() . To specify the Items relationship, you’d
select any Monster Instance and click
. To specify the Items relationship, you’d
select any Monster Instance and click ![]() to create a new Group. Creating
this new Group specifies that all other Monster’s have the same Group, with the
same configuration.
to create a new Group. Creating
this new Group specifies that all other Monster’s have the same Group, with the
same configuration.
If you are familiar with LDAP, it may be helpful to point out that the Variant Manager models data in a very similar way, with the key exception that only a single value may be supplied for a given attribute.
The User Interface

The Variant Manager uses a tree pane to display its hierarchical data. In a paradigm that should be familiar to many, clicking a node in the tree displays a form on the right hand side of the screen for manipulating that node. Changes made will be saved in memory when the user clicks to a different node in the tree, or does most other actions. However, changes must be explicitly saved to disk to persist beyond the current session. Each node in the tree has a unique path to it; selecting a node displays its path at the top of the right-hand screen. Again, note the similarity to LDAP’s Distinguished Name (DN).
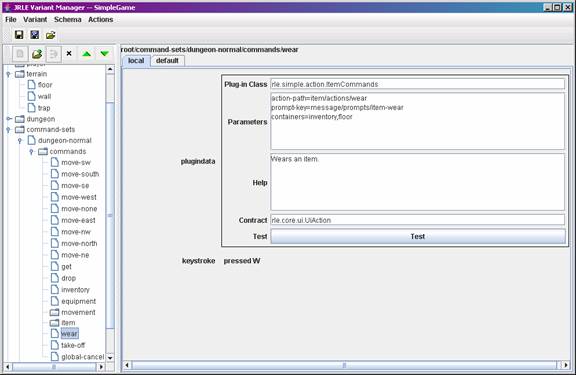
File Toolbar
Note the two toolbars above the tree. The top bar contains familiar file manipulation commands. From left to right:
- Save current project
- Save project as
- Open existing project
Tree Toolbar
The toolbar just above the tree contains commands that manipulate the tree itself. From left to right:
- Create new node. This command will attempt to create a child node of the currently selected node. Not all nodes support this command.
- Create new group. This command will create a new group under the current node and any other nodes of its same type.
- Group structure/attributes. Allows the user to manage the attributes that will configure members of this group.
- Delete node. Removes the selected node. Confirmation is required; if the node is a group, any other nodes which contained the same group will also have that group deleted!
- Up/Down buttons reorder the selected node by moving it up or down. These commands can be used on any node, and affect the order in which the programming APIs return nodes.
Support Arbitrary Data Capture With Editors
The Concept
An Editor is a graphical component designed to plug into the Variant Manager and capture data for a single attribute. The UI of an Editor can be as simple as a single check box or as complicated as required to capture the necessary information—some examples of more sophisticated editors are the Multi-Language Text Field and the Multi-Node Selector.
Editors are used when Attributes select them for use in configuration. We will discuss Attributes later on in this document (under the heading “Attribute Sets”).
Editors are managed via the Schema à Editors… menu item.
Supplied Editors
The Variant Manager comes with several pre-existing Editors.
Text Field
Use this Editor for capturing textual information that does not require internationalization.
CheckBox Editor
A single check box for capturing yes/no data.
Formatted Text Editor
Like the Text Editor, but accepts the “mask” parameter to ensure that only data of a certain format can be entered.
Multi-Language Text Editor
Provides a Text Field for each language supported by the project. See Languages.
Color Chooser
Allows selection of a single color using a JColorChooser Dialog.
Node Single Selector
Allows selection of a single Info Node from choices which are children of the path indicated in the “parent” parameter. This is a “drop down” control or “combo box.”
Node Multi-Selector
Allows selection of zero, one, or many nodes using the child nodes of the path indicated by the “parent” parameter as the available choices.
Plug-in
An Editor for specifying a pluggable Java class. This is the workhorse Editor which will be used to compose applications from loosely coupled components.
Number Editor
Displays a Spinner control for picking numbers.
Attribute Type Chooser
Specialized combo-box for choosing Runtime Attribute types.
Multi-Language Text Area
Provides a scrollable Text Area for each language supported by the project. Each language other than the Default Language (specified under Variant) also has a check box to certify the translation as acceptable. Certifications can be analyzed on a project-wide basis to quickly zero in on needed translation work using Actions à Translation Mode, which is covered under Languages.
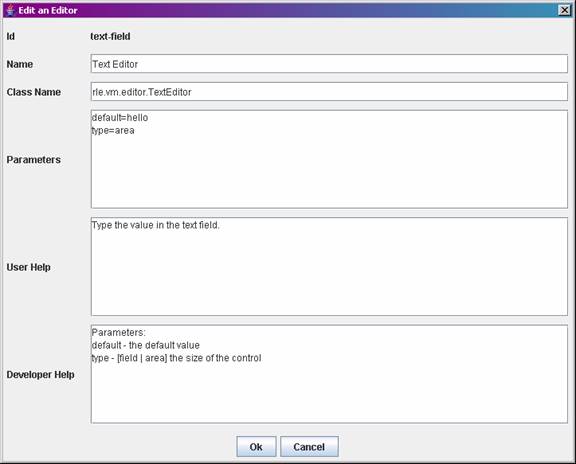
Parameters and Editors
To maximize the ability to customize Editor behavior without code changes, Editors can take two sets of parameters. The first set is specified in the Editor definition—to set parameters, simply type in some key=value pairs on separate lines as shown. This set of parameters allows a single Editor class to be re-used in several Editor definitions.
The second set of parameters is specified when the Editor is used—in the Attribute definition. These parameters are applied to the Editor after those in the Editor definition, and any parameters with the same key will end up with the value specified by the Attribute.
Creating a New Editor
It is easy to add new Editors. Simply implement a class that subclasses rle.vm.Editor and provides the functionality you want, then click the “Schema à Editors…” menu item, and click “create.”
Give your new Editor a unique ID, then fill out the
resulting form set it up.
Attribute Sets
The Concept
Attribute sets are simply lists of attributes which form a group which is always configured together. As we will see later, assigning one or more attribute sets to a Group Node enables us to specify how different types of nodes are configured.
There are two types of Attribute Sets. Global Attribute Sets can be shared by different Groups in a project. Each Group can also define a Local Attribute Set with attributes that apply to that Group alone.
Global Attribute Sets can be created by clicking the Schema à Global Attribute Sets… menu item.
Attributes
Attributes are logical bits of data that can be captured by a single Editor. The actual data captured is controlled entirely by the Editor. Parameters can be specified, which are passed to the Editor upon initialization and will override parameters of the same key specified in the Editor definition.
Attributes can be created in two ways; by adding them to a
Global Attribute Set, or by selecting a Group node and clicking the ![]() button in the tool bar above the tree (third
from the left).
button in the tool bar above the tree (third
from the left).
Here we see the Group configuration screen for the root/item/type node:
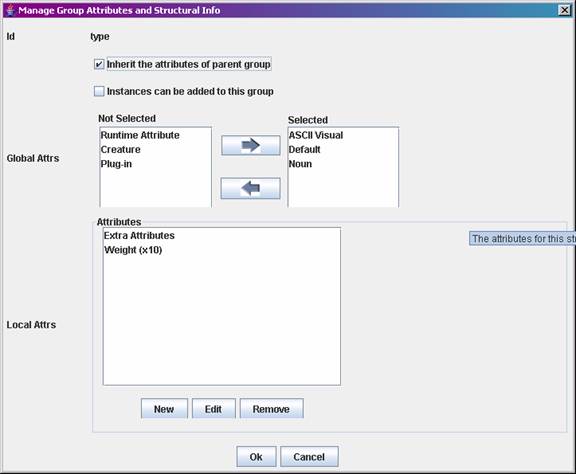
Note that both Global and Local Attribute Sets can be inherited from parent groups, and whether to allow nodes to be added to a Group is also configured here.
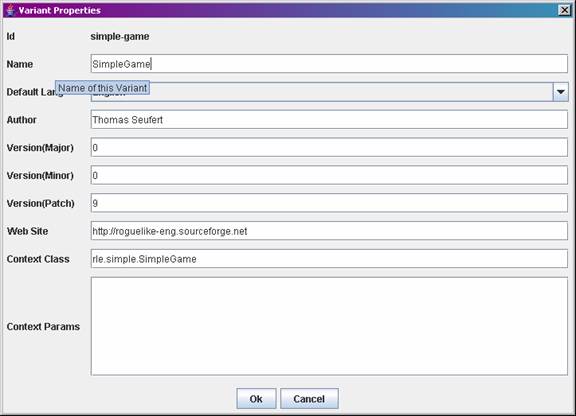
Variant Information
High level Variant information can be captured by clicking Variant à Properties…
Languages
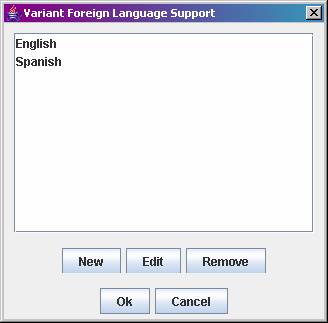
The variant manager provides a capability to specify which languages to support. Simply click Variant à Supported Languages, and click “create” to add support for a language. The multi-language text editor uses the list of languages to create controls for capturing text in each supported language.
Translation Mode
When writing a game that supports multiple languages, it can be difficult to keep track of what has been translated in which languages. This is especially apparent when you’re hitting up a knowledgable friend just to do the translations. Using Options à Translation Mode should simplify this.
While in Translation Mode, all Multi-Language Text Editors for a node show up on a single tab. In addition, the node tree shows how many untranslated nodes each parent node contains (recursively), and an (*) next to leaf nodes with uncertified translations. Translation mode can be activated for a single language, or for all languages.

See picture above for an example of translation mode in use. Note that in the tree, each node has in parentheses the number of child nodes with uncertified translations, allowing the user to quickly zero in on areas that need work. For instance, somewhere under the node root/message, there are 13 uncertified translations according to the picture.
|
Revision Date |
User |
Comments |
|
|
Thomas Seufert |
Created |
|
5/30/2004 |
Thomas Seufert |
Update for 0.0.7 |
|
|
Thomas Seufert |
Update for 0.0.9 |
|
|
Thomas Seufert |
Update for 0.2.0 |